Hey there, flower fans! Ever wondered how to keep those beautiful blooms from wilting away into oblivion? Well, you’re not alone. Tons of us want to lock in that floral glory forever, which is exactly where the techniques for drying and framing flowers come into play. Yep, you read that right. It’s a legit thing, and it’s easier than you think! Whether you’re preserving a special bouquet from a wedding or simply saving garden daisies just because, this guide’s gonna spill the tea on how to ace this process. Get ready to have your flower power freak flag flyin’ high!
Read Now : Cat-friendly Houseplant Options
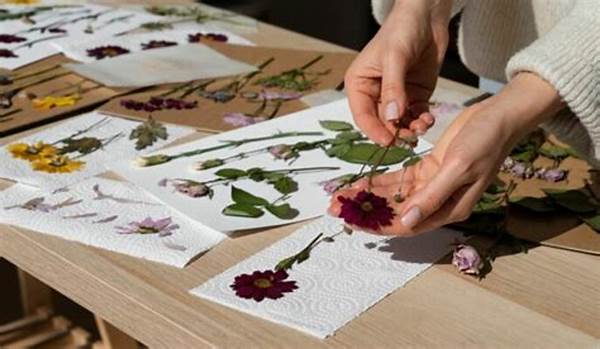
Getting Started with Your Floral Adventure
Alright, squad, let’s dive into the wonders of this art form. The techniques for drying and framing flowers are, quite frankly, the bee’s knees for anyone looking to hold onto a slice of blooming brilliance. First up, air-drying is a go-to. Hang your flowers upside down, let gravity do its thing, and you’ve got preserved prettiness in a week or two. It’s as easy as pie and just requires a little bit of patience.
Next, we have the ever-popular microwave method. Sounds wild? Maybe. But trust us, it’s faster than waiting for summer vacation to roll around. Just a couple of minutes, some silica gel, and voilà—you’ve got crispy, delicate blossoms ready to frame. It’s the kinda hack that makes even your grandma go, “Whoa, who knew?!” Oh, and let’s not skip the classic method of pressing flowers in a heavy book. It adds that old-school charm, perfect for adding a sentimental touch to your frames.
Ultimately, the techniques for drying and framing flowers can transform a simple petal into a cherished memory. Whether you’re a natural-born crafter or a rookie in this blooming business, it’s all about preserving beauty and nature in your unique style. So, gather your petals, choose your technique, and let your creativity bloom!
The Fast Lane to Flower Immortality
1. Air-Drying Delight: The original DIY. Flip those flowers upside down, leave ‘em hanging, and voila, you’re on the road to floral fabulousness. Patience is your bestie here, but the payoff? Oh, it’s sweet, trust us. The ultimate way to keep nature’s gifts looking this dandy with minimal fuss.
2. Microwave Magic: Who knew the microwave could be your go-to gadget for this floral adventure? Pop in some silica gel and let the buzz do its thing. It’s quick as lightning, and you’ll have dried petals looking like a million bucks in no time!
3. Book Worm Love: Grab a hefty tome, squish those petals between the pages, and just chill for a couple of weeks. You’ve got yourself a masterpiece in the making. Your old textbooks are finally getting their due.
4. Silica Gel Sorcery: A lil’ bit of this magic dust goes a long way. Bury your blooms, wait it out, and you’ve got pristine petals perfect for framing. It’s like floral archaeology, but way prettier.
5. Oven Charm: Pop those blooms in the oven at the lowest heat, and watch ‘em transform. Just keep an eye on them, or you might end up with crispy critters instead. Easy peasy, art made breezy!
Journey of Floral Keepsakes
Let’s keep this train rolling with some background jams on techniques for drying and framing flowers. Trust us, it’s a hobby that’s been around more than your grandmother’s finicky cat. It’s about combing through the roots of creative and crafty activity and blooming into a downright art form.
Y’see, flowers have always been a human fascination. From ancient Egypt to the Victorian era, folks have wanted to capture that fleeting beauty. Drying flowers was once, like, totally standard practice. Fast forward to now, and these timeless techniques for drying and framing flowers still bring joy to anyone willing to give it a whirl.
From sentimental gestures to funky art pieces, there are endless ways to express yourself with this craft. It’s like capturing a moment in time, pressing pause on the hectic chaos of today. Whether you’re preserving wedding petals or creating a floral wall of fame, you’re bound to catch and keep those precious moments. Unleash the Picasso in you with this timeless craft—it’s a flower frontier just waiting to be explored.
Blossom Tricks Up Your Sleeve
Here are some deets and secrets you need to amp up your game:
1. The Rule of Threes: Groups of three look fab when framing. It’s an art thing, promise. Keep it tight, keep it right.
2. Color Play: Mix and match your shades. It’s like a rainbow exploded into fabulousness. Go bold or gentle, your palette knows no bounds.
3. Spacing FTW: Your petals need space to breathe in those frames, pal. Cramming? Total no-no.
4. Seal the Deal: A spritz of sealant keeps those blooms looking fresh. Think of it as SPF for flowers!
Read Now : Techniques For Maintaining Flower Freshness
5. Layer Lovelies: Arrange layers to add depth and plenty of ‘wow’ factor. The more the merrier!
6. Texture Talk: Mix up textures for extra eye candy. Smooth, rough, silky—it all works!
7. Dimensional Dazzle: Squash? Please, not here. Raise those petals for a wicked 3D vibe.
8. Seasonal’s In: Flowers that are in season tend to dry better. Coincidence? We think not.
9. DIY Frames: Make your own frames for the ultimate personal touch. Ain’t nobody got time for cookie-cutters.
10. Patience, Young Grasshopper: Give your creation time to rest—like a fine wine, things age beautifully.
Frame It Like a Pro
Okay, flower power posse, let’s chat about what goes into creating those jaw-droppingly gorgeous frames. You’ve got the flowers managed, now, how do we make ‘em pop on the wall? The techniques for drying and framing flowers begin with understanding your own creative vibes and letting them flow into every frame you set up.
Kick things off by choosing frames that compliment rather than compete with your flowers. Think of the frame as the stage and your flowers as the star performers. Yeah, drama. Aim for something neutral if your blooms are particularly vibrant, or go bold if your florals are on the subtle side. Groundbreaking, we know.
Next up, when arranging your blooms, focus on balance and cohesion. The composition should feel harmonious, inviting the eye to travel naturally across your floral masterpiece. And don’t forget layers! Add some selected petals upfront and leave some behind—it gives a super cool depth effect. It’s all about that texture, baby. Use a mix of matte and glossy to keep things interesting. Keep experimenting, because finding what works for you, and your space is half the fun.
Finish with a flourish! Attach your dried beauties carefully and ensure that they are shielded from direct sunlight to avoid any fading fiascos. Who knew techniques for drying and framing flowers could turn into such a stylish pursuit? Looks like the walls of your humble abode are about to get the ultimate floral upgrade. Time to get crackin’!
In the Groove of Flower Framing
Finally, let’s wrap things up with some pro tips on perfecting your flowering frame shenanigans. It’s an art and a science, but with the right techniques for drying and framing flowers, you’re golden.
Finding the perfect spot to hang your masterpiece is the cherry on top. Think of places with indirect light—too much sun, and those colors might start to fade faster than a Snapchat story. Keep it fresh and inspired! Each flower frame should be a reflection of you and your unique flair.
Consider your frames’ hardware. Lightweight frames with secure hooks are your best bet to avoid any gravity mishaps. After all, we’re all about preserving beauty, not causing casualties on your living room floor. Lastly, try changing things up every now and then! Switch out flowers, rotate frames, or just add to your growing gallery of florals. It keeps things lively and ensures that your environment reflects the ever-evolving flowery flair you’re rocking. Embrace these techniques for drying and framing flowers, my friends, and let the artistic adventures bloom!