Hey there, flower fans! So, you’ve got a bunch of beautiful blooms, and you wanna keep ’em around a bit longer, huh? Well, you’re in the right place. Whether you’re a total newbie or a wannabe pro in the art of drying flowers, we’re diving into the nitty-gritty of preserving those lovely petals right here. Let’s get those flowers looking fab for ages!
Read Now : Teaching Kids About Photosynthesis
Getting Started with DIY Flower Drying for Novices
Okay, so you’re ready to jump into DIY flower drying for novices. First off, take a chill pill, it ain’t rocket science. You’ll need some basic stuff like flowers, of course, some string, and maybe a few books for pressing. Maybe grab your favorite drink ’cause we’re gonna channel those Zen vibes. Drying flowers is kinda like a time machine for preserving bouquets; it stops time at that perfect bloom moment. So, if you’re into nostalgia or capturing moments, this is your jam.
Now, you could go all artsy with this or just keep it simple—either way, you’re gonna have some fun. Think about it like turning a fresh bouquet into a forever keepsake. Imagine your fave flowers staying forever young. It’s almost like magic but without the wand. For those keen on exploring DIY flower drying for novices, you’re not just making dried flowers; you’re crafting memories that won’t wilt away.
Simple Techniques for DIY Flower Drying for Novices
1. Hang ‘Em Up: Grab a bunch of flowers, tie ’em together, hang them upside down. Boom! You’ve started your DIY flower drying for novices adventure.
2. Press ‘Em: Sandwich your flowers between book pages, wait a couple of weeks. Hello, flat beauties!
3. Microwave Magic: Quick tip for the impatient: dry small flowers in the microwave. Mind-blowing, right?
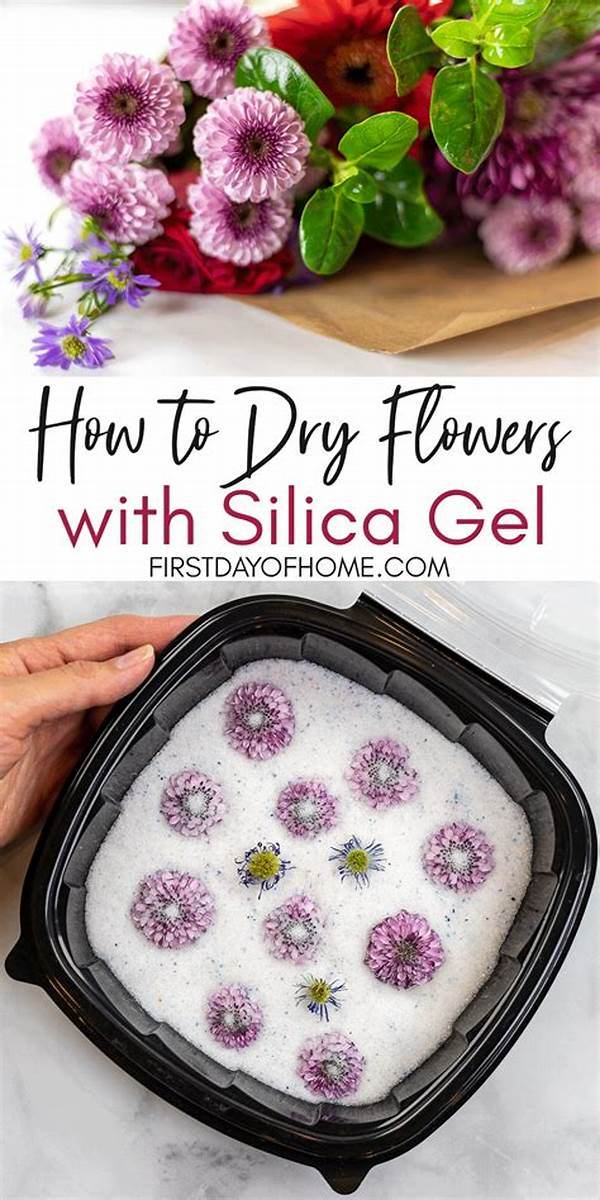
4. Silica Gel Method: Cover flowers in silica gel for a couple of days for vibrant color and shape. Fancy, huh?
5. Oven Drying: Pop them in the oven at low heat. Slow and steady wins the race, folks!
Tools and Materials for DIY Flower Drying for Novices
So, you’ve got those flowers ready, and you’re itching to start DIY flower drying for novices? You’re gonna need a few basic tools. Got a string? Great. A big book? Awesome. You’ll find pressing flowers is just like making a flower sandwich, only this one’s for your eyes, not your belly.
If you’re the impatient type, microwaving might become your new best friend in this DIY flower drying for novices journey. And trust me, you don’t need any fancy gadgets. Some silica gel from the craft store or a lil’ help from your oven, and you’re all set. These simple tools and materials make a massive difference in how you’ll rock this floral gig!
Pros and Cons of DIY Flower Drying for Novices
1. Pro: Memories Last Forever: Your blooms are frozen in time, perfect for scrapbooks or décor.
2. Con: Takes Patience: Hanging and pressing ain’t instant, folks.
3. Pro: Easy Peasy: Mostly, you just need things you already have at home.
4. Con: Not All Blooms Dry Well: Might need to experiment with different flowers.
5. Pro: Budget-Friendly Hobby: Pick flowers, dry ’em out — no big budget required.
Read Now : Learning Wildflower Features And Identification
6. Con: Trial and Error: Yeah, not all attempts are gonna be Insta-perfect.
7. Pro: Creative Outlet: Get artsy, turn dried flowers into anything from cards to art.
8. Con: Equipment Sometimes Needed: Silica gel or an oven can be necessary for best results.
9. Pro: Eco-Friendly: Recycle those blooms that would otherwise be binned.
10. Con: Color Might Fade: Don’t expect all colors to stay true forever.
Advanced Tips for DIY Flower Drying for Novices
Alright, so you’re past the basics of this whole DIY flower drying for novices saga. Time to step up your game with some advanced tips. First off, diving into silica gel method—this one’s a winner for color preservation. Sure, it sounds like a chemistry class throwback, but hang with me. It’s actually super straightforward. Just bury your flowers in that gel and let it do its thing for a few days.
Wanna keep those petals looking extra poppin’? Try using glycerin. A mix of glycerin and water can replace natural moisture in the petals, leaving them soft and vibrant. I mean, who doesn’t want their dried flowers to look like they just came off a Pinterest board? Also, think about combining different methods like hanging and pressing. It’ll give you a range of textures and styles for your floral art.
DIY Flower Drying for Novices: Creative Uses
When you’ve mastered DIY flower drying for novices, it’s time to get your creative juices flowing. Those dried beauties aren’t just for looking pretty; they’re a muse for all sorts of artsy stuff. Picture this – embellishing photo frames, jazzing up gift wrappings, or sprucing up your stationery. Let’s face it, who wouldn’t love a personal touch that screams handcrafted love?
For the romantics in the house, dried petals can be the perfect addition to homemade potpourri or romantic candle decor. You’re not just drying flowers; you’re creating an experience, a vibe, a memory. And here’s a hot tip: make them part of seasonal decorations—autumn wreaths anyone? Unleash your inner artist; your home is your canvas, and these flowers are your paint.
Final Thoughts on DIY Flower Drying for Novices
To wrap up this epic journey of DIY flower drying for novices, let me just say this: it’s a chill hobby that totally pays off. You start with this fresh bouquet and end with memories encased in dried blossoms. How cool is that? It’s like bottling up happiness and popping the cork whenever you wish.
Whether you’re a beginner in the DIY scene or just someone who appreciates a good-looking piece of nature, DIY flower drying for novices offers both simplicity and a touch of elegance that even the most amateur florist can achieve. So, grab those scissors, find your fav blooms, and dive into your next craft adventure. It’s a fun way to keep a piece of the beauty around you frozen in time, no expert skills needed. And remember, there’s no right or wrong here; just you, your flowers, and a whole lot of creativity.